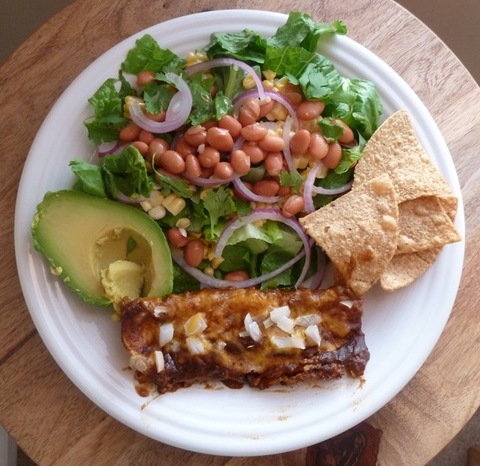
Remember summer? Me neither. Don't we need a little reminder? Yes, I think so. The Simple Southwestern Salad is so easy, refreshing and tasty. It is the perfect compliment to the cheese enchiladas I shared a few weeks ago. Plus, you probably have most of the ingredients in your pantry already! Simple Southwestern Salad with Corn and AvocadoSource: Real SimpleServes 4 2 heads romaine lettuce, cut into pieces 2 ears of corn, with kernels cut off (please don't use frozen corn, it would make the salad bland and lack texture. But it is your salad, maybe you prefer salads like that!) 2 avocados (cut into cubes, I just halved mine because I was in a hurry, and I'm lazy.) 1 15.5 ounce pinto beans, rinsed 1/2 red onion thinly sliced a handful fresh cilantro 1/4 cup olive oil 1/4 cup fresh lime juice 1/2 teaspoon ground cumin 3/4 teaspoon salt 1/4 teaspoon pepper tortilla chips Combine the lettuce, corn, avocados, beans, onion and cilantro in a large bowl. Mix together oil, lime juice, cumin, salt and pepper in a small bowl or shake it together in a mason jar. Toss the salad with the dressing and serve with some tortilla chips on the side. I like to crumble them up and mix them into the salad. Yummmm.
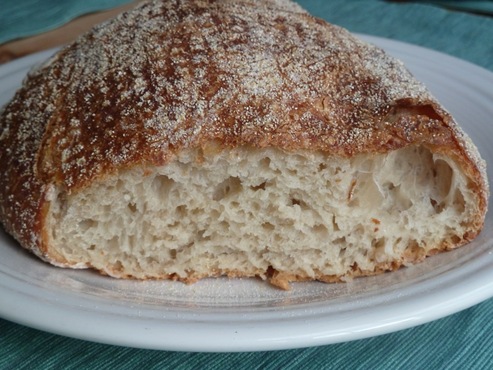
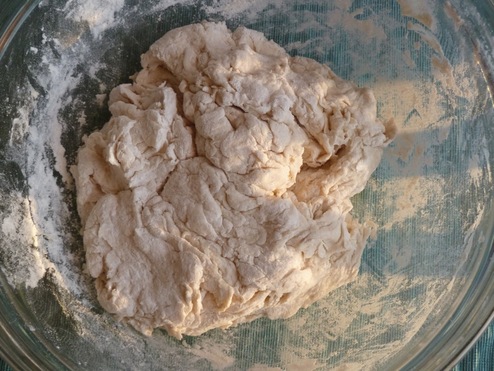
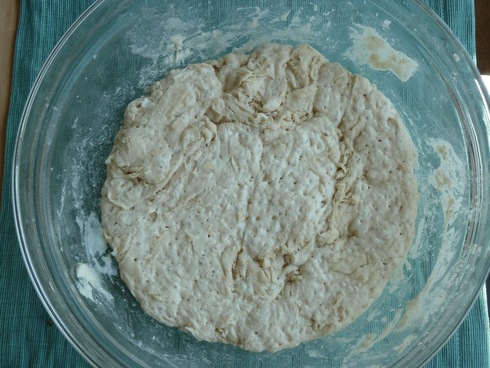
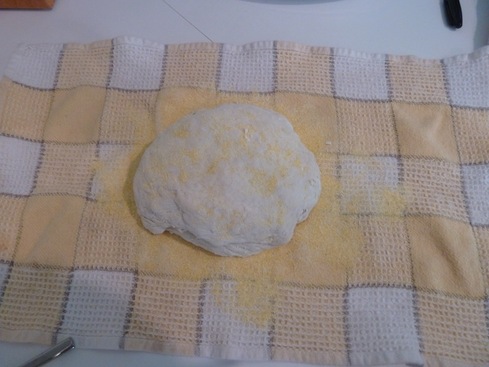
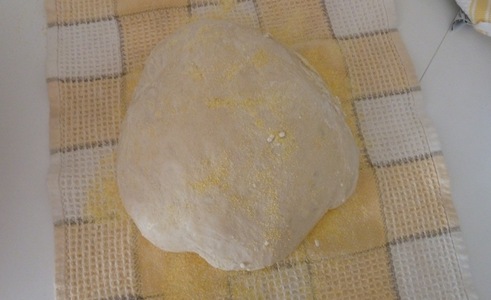
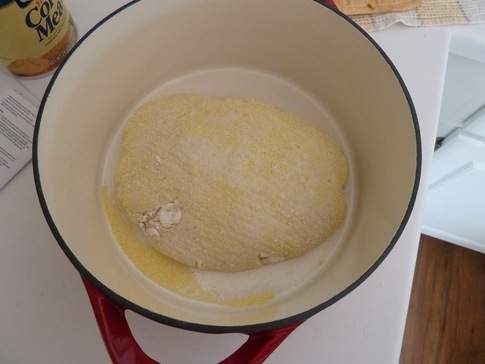
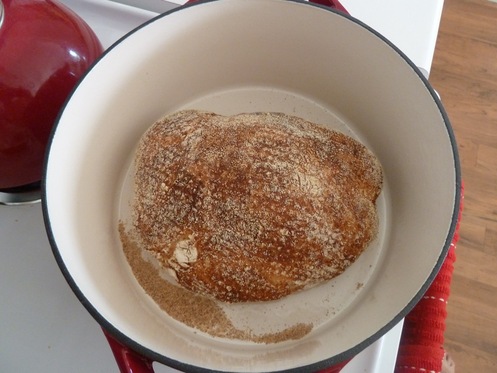
I made bread!!! and it's sooo gooooooood! but it's even easier than it is good, which is a lot! Can you tell I'm excited about this recipe? Jim Lahey, a baker in New York City developed it and the Times calls it "revolutionary" because of its "combination of great crumb, lightness, incredible flavor...and an enviable, crackling crust, the feature of bread that most frequently separates the amateurs from the pros." Are you excited yet?! Don't you want to make this bread right now?! Well don't go preheating your oven yet, because that part doesn't come until 20 hours from now. Yes, what makes this bread so fabulous is that you needn't knead it, because the long time for rising does the work that is normally done by kneading. Does it sound like I know what I'm talking about? Because I don't. I just followed the directions. If you're interested in the science you should read the Times article linked above, very interesting! Ok let's get down to it. In a large bowl stir together 3 cups flour, 1/4 teaspoon yeast and 1 1/4 teaspoon salt. Pour in 1 5/8 cups of water and mix together with a spatula or your hands just until the dough comes together. It won't be pretty, don't worry. You can't really mess this up, for instance I thought that 1/4 teaspoon yeast was entirely too little and instead put in a whole packet, as if I knew more than a master baker. But the bread still turned out amazing so again, don't worry no matter how ugly your dough looks at first. Put some plastic wrap over it and let it sit for 18 hours. When it's ready it'll look like this, with little bubbles all over. Pour the dough onto a floured surface. The dough will be very sticky so add some flour on top so it doesn't stick to your hands. Flatten it a bit with your hands, then fold it over onto itself twice and shape it into a ball. On a cotton towel (not terry cloth) sprinkle some cornmeal or wheat bran. Put the dough on it seam side down. Sprinkle some more cornmeal or wheat bran on top and fold the towel to cover the dough. Let it sit for another 2 hours. After 1 hour and 30 minutes have passed, put a heavy bottomed pot with a lid in the oven and preheat the oven to 450 degrees. It should be a lot bigger after 2 hours. Starting to look like bread huh? Now carefully take the hot pot out of the oven and plop the dough into it with the seam side up. Mine didn't have much of a seam, but that's okay.
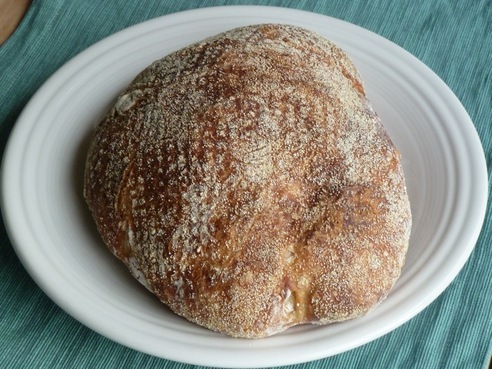
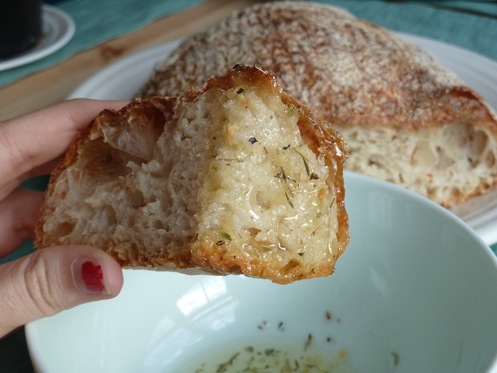
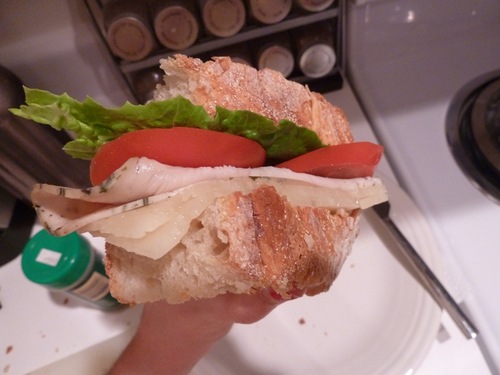
Put the lid back on the pot and bake for 30 minutes. Then take the lid off and bake for 15 more minutes or until bread is browned, up to 30 minutes. Let cool on a rack and then stare at it. Is it not the most beautiful loaf of bread you ever saw, and all the more beautiful because you made it? Note the delicious caramel color of the crust, the subtle grid pattern left by your cotton towel, the artful contrast between the cornmeal and the crust. Once you have fully savored this moment and have taken a few pictures for posterity, you may cut into your bread. Gasp! Even more to admire! Look at all those air bubbles! Feel the weight of the bread in your poorly manicured fingers. Just the right consistency for absorbing an italian seasoned olive oil. Check out this monster sandwich. What a great picture, it looks like it's attacking you! The only downside to this bread, (is it even a downside?) is that the crust leaves a lot of crumbs, you can see them all over the background in this picture. You're gonna have to sweep your kitchen floor after slicing this bread. But that is just the price you pay for a crust that "separates the amateurs from the pros!" Recipe source: New York Times
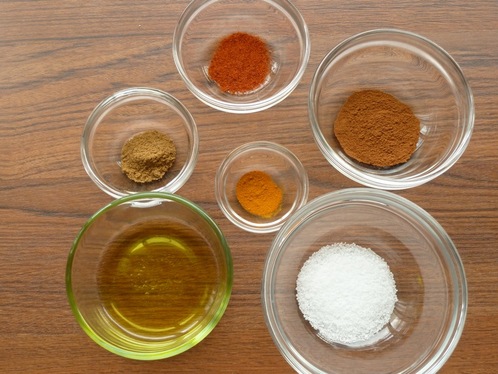
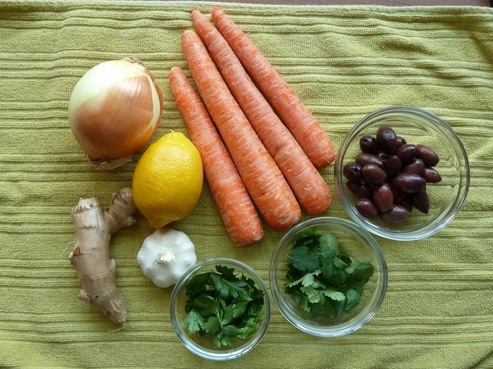
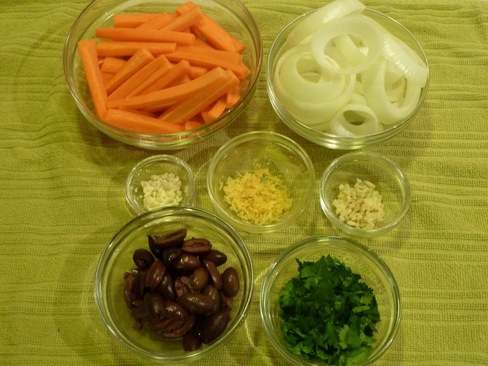
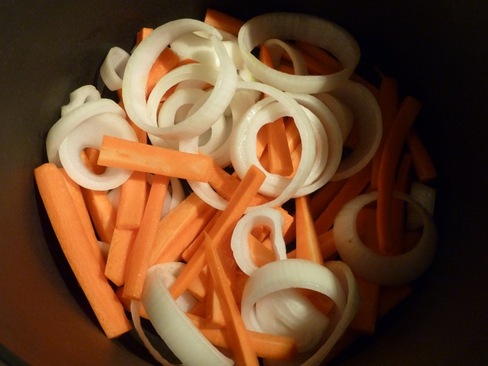
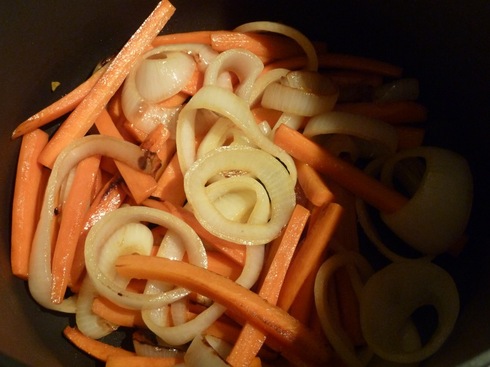
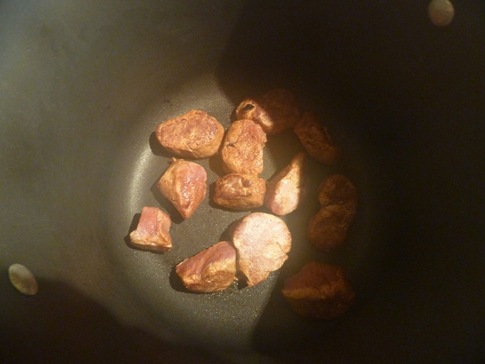
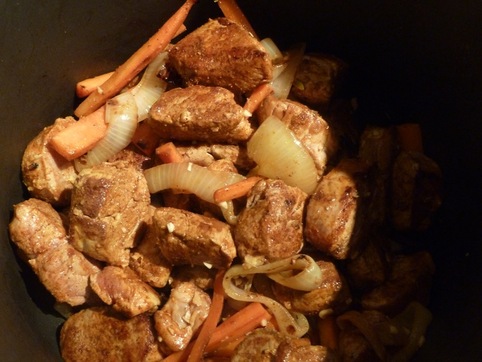
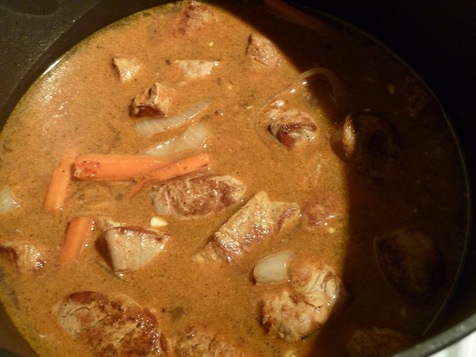
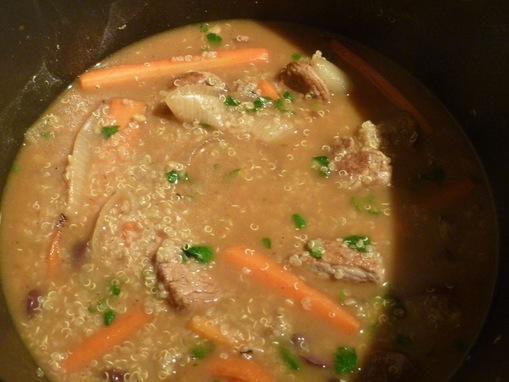
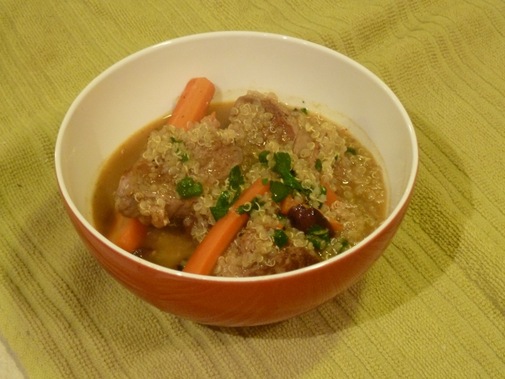
Tagine is a traditional North African dish cooked in a device of the same name. It consists of tender meat and spiced vegetables. This is my version! Gather 2 teaspoons paprika (I forgot to get it in the picture!), 1/4 teaspoon turmeric, 1/2 teaspoon cumin, 1/4 teaspoon cayenne pepper, 1 teaspoon ground cinnamon, 1 teaspoon kosher salt and 2 tablespoons olive oil. In a plastic bag, mix all these flavors together, throw in 2 1/2 lbs pork tenderloin and toss to coat. I'm not convinced this is the best meat choice, It's quite expensive. If you can think of something better let me know in a comment! When you buy the meat, ask your butcher to cut it into 1 1/2 inch pieces. Don't be afraid, they're just waiting for someone to ask them to do something butchery! Anyway, let the meet marinate in the fridge for at least 1 hour, and no more than 12. When you're ready to start cookin' get 4 carrots, pitted kalamata olives, parsley, cilantro, 1 clove garlic, ginger, lemon, and an onion. Also 32 oz chicken broth. For your mise en place, cut the carrots into thin sticks about 3 inches long, cut the onion into thick slices, zest half the lemon, grate (or chop into tiny pieces) the ginger, mince the garlic, slice the olives in half, and chop the parsley and cilantro. Mise en place is a great phrase, I just learned it. Can you use context clues to figure out what it means? If not, click here! Oh yeah! I almost forgot! Around this time start cooking the quinoa according to the directions. You'll need about a 10 oz box. Heat another 2 tablespoons of olive oil in a large pot over medium heat. Add the carrots and onions and cook for about 15 minutes until they look like this... sooo tasty! Transfer them to a plate. Adding a few bits of pork at a time, brown all sides and then put aside on a plate. Repeat with remaining pork until they're all browned. Add all the pork, onion and carrots back to the pot, and stir in the garlic, ginger and lemon zest too. Pour in the whole box of chicken broth and bring to a boil. Once it's boiling, take out the biggest piece of pork and cut it in half to make sure it's done. If it's not ready yet, keep the broth boiling and check another piece in a few minutes. Once, the pork's cooked, stir in the quinoa, cilantro, parsley and olives. Spoon into bowls and enjoy! Pork Tagine with Quinoaadapted from Real Simple2 teaspoons paprika 1/4 teaspoon ground turmeric 1/2 teaspoon ground cumin 1/4 teaspoon cayenne pepper 1 teaspoon ground cinnamon 1 teaspoon kosher salt 4 tablespoons olive oil 2 1/2 lbs pork tenderloin, cut into 1 1/2 inch pieces 1 medium yellow onion, thickly sliced 4 carrots, peeled and cut into thin 3 inch strips. 1 clove garlic, finely chopped 1 tablespoon grated fresh ginger zest of 1/2 lemon, grated 1 32 ounce container low sodium chicken broth 1 10 ounce box of quinoa handful of chopped cilantro handful of chopped parsley 3/4 cup kalamata olives pitted and halved. In a ziploc bag, combine first 6 ingredients and 2 tablespoons of olive oil. Add the pork and shake to coat. Refrigerate for at least 1 hour, no more than 12 hours. When you are ready to start cooking, cook quinoa according to box directions. Heat the remaining 2 tbspns of oil in a large pot over medium heat. Cook onions and carrots for 15 minutes, stirring occasionally. Transfer to a plate. Adding a few pork pieces at a time, brown all the pork on all sides and set aside. Return browned pork to the pot with onions, carrots, garlic, ginger and lemon zest. Add chicken broth and bring to a boil. Once pork is done, stir in quinoa, cilantro, parsley and olives. Divide into bowls and serve.
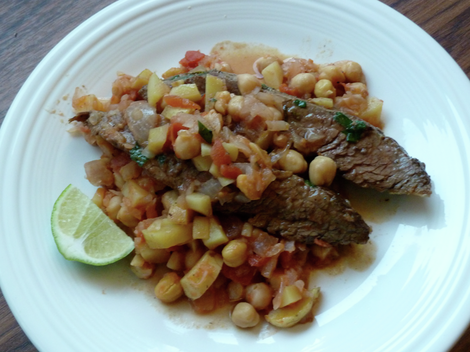
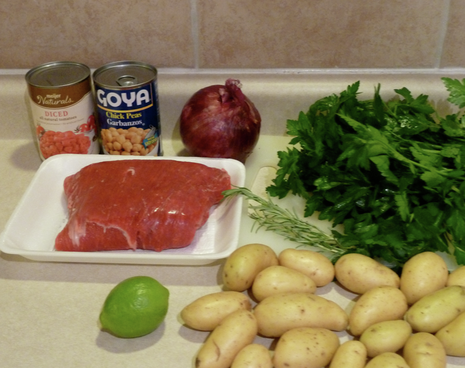
Marcus Samuelsson is my favorite celebrity chef. Ina Garten is a close second. Her recipes, though classic American/European staples I've made a million times, can sometimes be onerous. Marcus Samuelsson's cuisine, on the other hand, is exotic and easy! When I make one of his dishes for the first time, I can't even begin to comprehend what it will taste like. In the end, the dishes have a fresh, delicate yet flavorful quality. It's hard for me to describe, I just find his dishes super satisfying. Now that I've gotten you excited, let's make Samuelsson's Flank Steak with Potato Ragu! Here's what you will need (in clockwise order): red onion, parsley, rosemary, fingerling or yukon gold potatoes, 1 lime, 1 1/2 lb flank steak, diced tomatoes, chickpeas. Not shown: garlic, salt, pepper and olive oil. Interesting combination right: rosemary and lime? potatoes and tomatoes? Actually, I guess potatoes and tomatoes go pretty well together if french fries and ketchup are any indication. But still, rosemary with stuff like limes and tomatoes? Don't be afraid, it tastes amazing! The rosemary and garlic compliment the flank steak perfectly, while the ragu's tanginess, thanks to the lime and tomatoes, contrasts the richness of the steak. I don't have very good progress pictures so I will just jump straight to the recipe. I really think you should try this one; it's simple, savory and satisfying. Flank Steak with Potato Raguminimally adapted from Samuelsson's recipe. 1.5 lbs flank steak, rubbed with salt and pepper to taste. salt to taste pepper to taste 3 tblspns olive oil 1 large or 2 medium garlic clove(s) 1/2 teaspoon chopped rosemary 2 cups chopped fingerling or yukon gold potatoes 1 14 oz can diced tomatoes 1 red onion, diced 1 14 oz can chickpeas chopped parsley to taste 1 lime Heat 2 tblspns olive oil in a medium sauce pan on high heat. Add potatoes and salt and pepper. Stirring frequently, cook for 3 minutes. Mix in the red onions and chickpeas, then pour in the tomatoes including the juices. Reduce to a simmer and cook for 5-8 minutes or until only 1/3 of the liquid remains. Continue to cook on low heat for 10 minutes. Meanwhile, heat the rest of the olive oil (1 tblspn), garlic and rosemary in a pan over medium-high heat. Once the oil is hot, place the steak in the pan and cook one side for 5 minutes. Flip it and cook the other side for 5 minutes for a rare (ish) steak, if you had a super thick steak like I did, if yours is thinner it will take less time. Follow your instincts! I'm a big fan of meat thermometers. If you are picky about your steak's done-ness, refer to this handy system: rare=120-125 degrees, medium=140-145 degrees, well done= 160+ degrees. Note that this applies only to beef. Don't go cooking your chicken to 120 degrees, blech! Now that I've unnecessarily put the concern of food poisoning in your mind, let's continue with the recipe! When the steak is done to your liking, put it on a cutting board, top it with chopped parsley and let it rest for at least 5 minutes. This helps the juices redistribute throughout the meat so it will all be juicy! Stir the meat juices from the pan into the potato ragu. Plate the ragu and cut the steak across the grain at a 45 degree angle into slices. Cutting it in this specific way makes it less chewy. Place the slices on top of the ragu and squirt with lime. Don't forget the lime! I can think of two reasons why you might not try this dish: 1) your fear of cooking the steak too little or too much, 2) your fear of cutting the steak just right. Allow me to allay these concerns. I had trouble cooking the steak enough. I would cut into it and it would be too bloody. So I just threw it back in the pan and cooked it for a few more minutes. Still, it was too rare for us, so I wound up cutting the slices and then searing them individually for like, a minute. That was the perfect amount. The beef was tender and juicy but not bloody. So, I would suggest erring on the side of cooking less, because you can always cook it a bit more. But if you cook it too long, it will be dry and chewy, but honestly it will still probably taste good with that garlic and rosemary on it. Also, don't worry about taking your time to make the steak perfect. The ragu can sit for a while and be fine on low heat. It will be waiting for you when you are ready for it. Don't worry about cutting the steak! Who cares if it looks pretty, you're going to eat it anyway! If you mangle it really bad, you can just cut it into bite sized pieces and save your diners an extra step.
After our Alaska trip, we've recently come into possession of a whole lot of halibut! Today, I will walk you through this recipe in which this monster of a fish.... becomes this delightful dish. 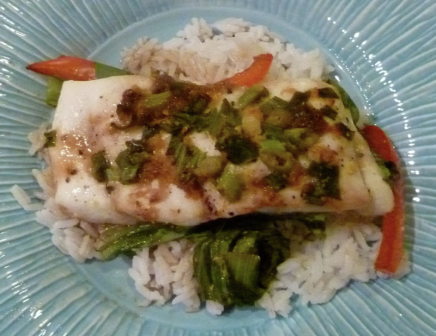 Ok, full disclosure, I don't really know if the halibut we ate is the halibut I caught, but someone in our family caught it!
Another great recipe from Noble Pig. It's perfect for summer because it's a nice frosty treat and there's no cooking involved, just mixing.
The last recipe was vegan friendly. This one is not! 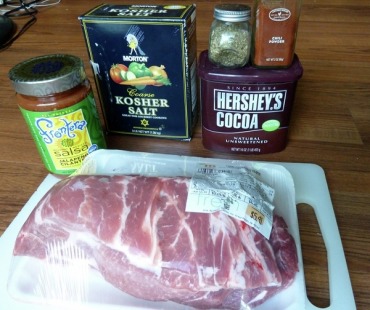 mmmmmm, meat!
I love this recipe from Noble Pig! There are so many great things about it. It is not your typical tortilla soup, or at least not the typical soup I've ordered at many a Mexican restaurant in Texas. For one thing, it is vegan and gluten free! (Note: Apparently some Vegetable Broths are gluten free and some are not, so it depends on what kind you buy.) For another thing, it is very customizable depending on how much time you have to prepare it. You could use all fresh vegetables you prepared yourself or use canned or frozen veggies, or a mix of both, which is what I did. Use the link above for the exact recipe, I will just give you a few tips and possible substitutions.
|


 RSS Feed